

|
For those who have not completed games in the 异度神剑 series, this page contains spoilers regarding the plot. Discretion is advised. |
This page lists locations where 以太 Crystals can be mined in 异度神剑. For locations on Bionis, these are 以太 crystal deposits. For locations on Mechonis, these are 以太 gears. The numbers in each area correspond with the numbers on the area maps on the JCE.
Contents
Tephra Cave
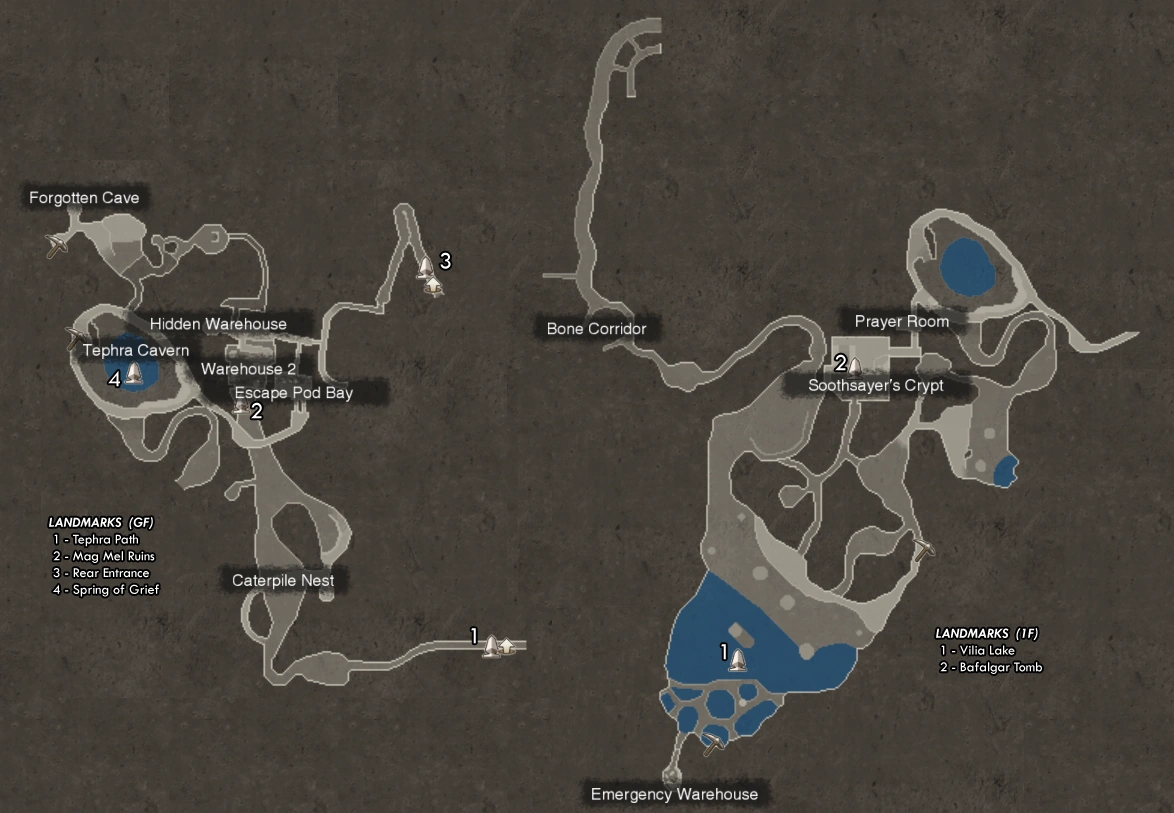
Map of Tephra Cave (click to enlarge)
- Near Spring of Grief [Ice]
- NE of Vilia Lake [Earth]
- S of Vilia Lake [Water]
- In the Forgotten Cave [Earth]
- NW-most deposit on 2F, no nearby locations or landmarks [Fire]
- Near the Heavenly Window [Fire]
Bionis' Leg
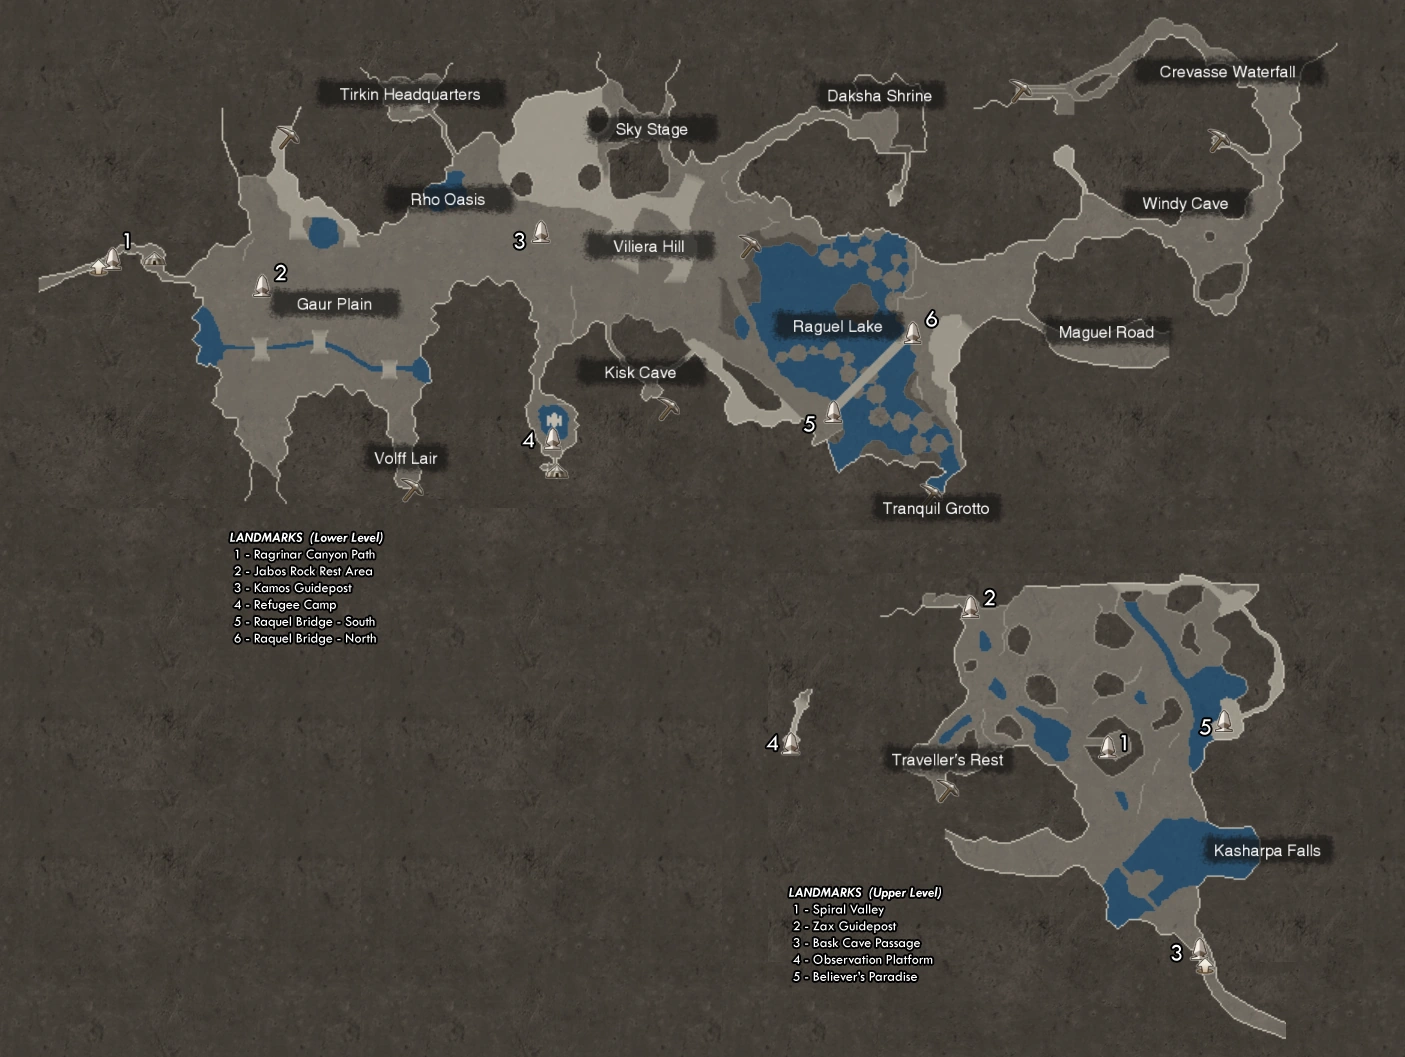
Map of Bionis' Leg lower level (click to enlarge)
Map of Bionis' Leg upper level (click to enlarge)
- ENE of Jabos rock Rest Area and NW of Rho Oasis [Wind]
- S end of Volff Lair [Electric]
- S end of Kisk Cave [Electric]
- 以太 Up I
- Double Attack I
- Tranquil Grotto [Water]
- E of Daksha Shrine and WSW of Crevasse Waterfall [Wind]
- N of Windy Cave and S of Crevasse Waterfall [Electric]
- 以太 Up I
- 雷电 Plus I
- First Attack Plus I
- Daze Resist I
- E of Viliera Hill and NW of Raguel Lake [Wind]
- Agility Up I
- 倒地 Resist I
- Quick Step I
- Aerial Cloak I
- S of Traveller's Rest [Water]
Colony 6
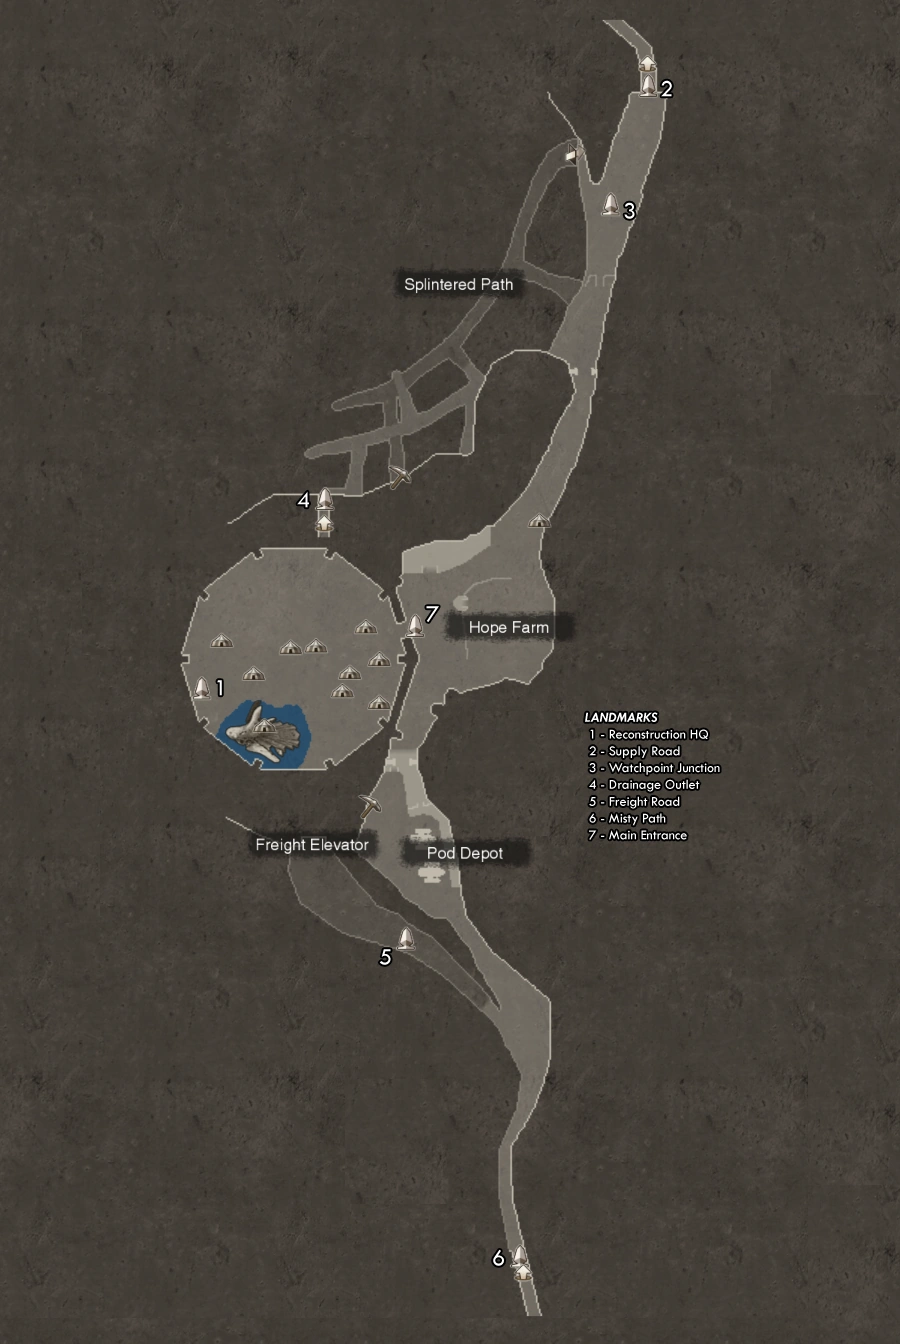
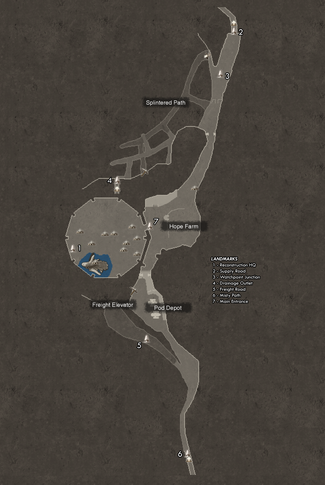
Map of Colony 6 (click to enlarge)
The rank of crystals obtained from these deposits begins at two and increases up to rank five during the reconstruction of Colony 6 as the Nature level of Colony 6 is increased.
- NE of Drainage Outlet [Wind]
- Agility Up II, III, IV, V
- Fall Defence II, III, IV, V
- NW of Pod Depot and NE of Freight Elevator [Water]
- HP Up II, III, IV, V
- Paralysis Resist II, III, IV, V
以太 Mine
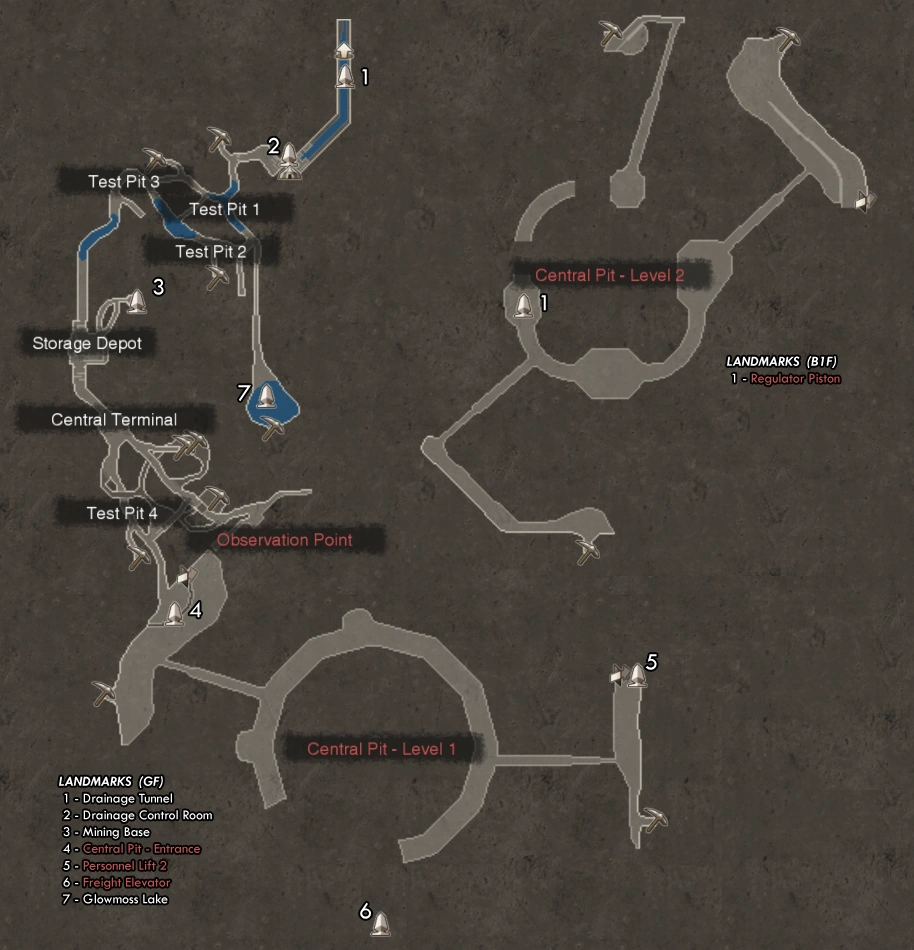
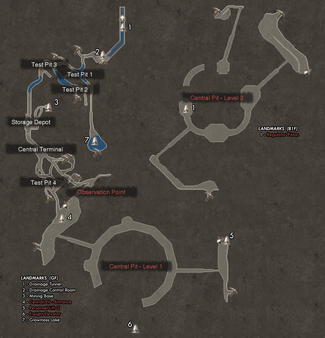
Map of the upper levels of the 以太 Mine (click to enlarge)
Map of the lower levels of the 以太 Mine (click to enlarge)
The rank of crystals obtained from deposits one through eight begins at two and increases up to rank five during the reconstruction of Colony 6 as the Nature level of Colony 6 is increased.
Deposits nine through nineteen become inaccessible after Xord is defeated.
- W of Drainage 魂控 Room [Earth]
- Muscle Up II, III, IV, V
- Bleed Defence II, III, IV, V
- N of Test Pit 3 [Wind]
- Agility Up II, III, IV, V
- Agility Down II, III, IV, V
- S of Test Pit 2 [Fire]
- Strength Up II, III, IV, V
- 束缚 Resist II, III, IV, V
- S at Glowmoss Lake [Water]
- HP Up II, III, IV, V
- Poison Defence II, III, IV, V
- First deposit ESE of Central 终端 [Electric]
- S of Test Pit 4 [Ice]
- 以太 Def Up II, III, IV, V
- Blaze Defence II, III, IV, V
- Second deposit ESE of Central 终端 [Fire]
- Strength Up II, III, IV, V
- Strength Down II, III, IV, V
- 武器 Power II, III, IV, V
- Aggro Up II, III, IV, V
- E of Test Pit 4 [Ice]
- 以太 Def Up II, III, IV, V
- Blaze Defence II, III, IV, V
- Auto-Atk Stealth II, III, IV, V
- Arts Stealth II, III, IV, V
- S of Personnel Lift 2 [Water]
- HP Up II
- Paralysis Resist II
- SW of Central Pit - Entrance [Wind]
- B1F NE crystal deposit [Fire]
- B1F N crystal deposit [Electric]
- SSE of Regulation Piston [Earth]
- Attack Stability II
- Bleed Defence II
- B2F E-most crystal deposit [Electric]
- 以太 Up II
- Phys Def Down II
- B2F N-most crystal deposit [Earth]
- Muscle Up II
- 以太 Down II
- B2F NW crystal deposit [Ice]
- 以太 Def Up II
- 以太 Protect II
- B2F W-most crystal deposit [Fire]
- Strength Up II
- Revival HP Up II
- NNW of Personnel Lift 3 [Wind]
- Agility Up II
- Quick Step II
- B3F N-most crystal deposit [Ice]
- 以太 Def Up II
- 束缚 II
Satorl Marsh
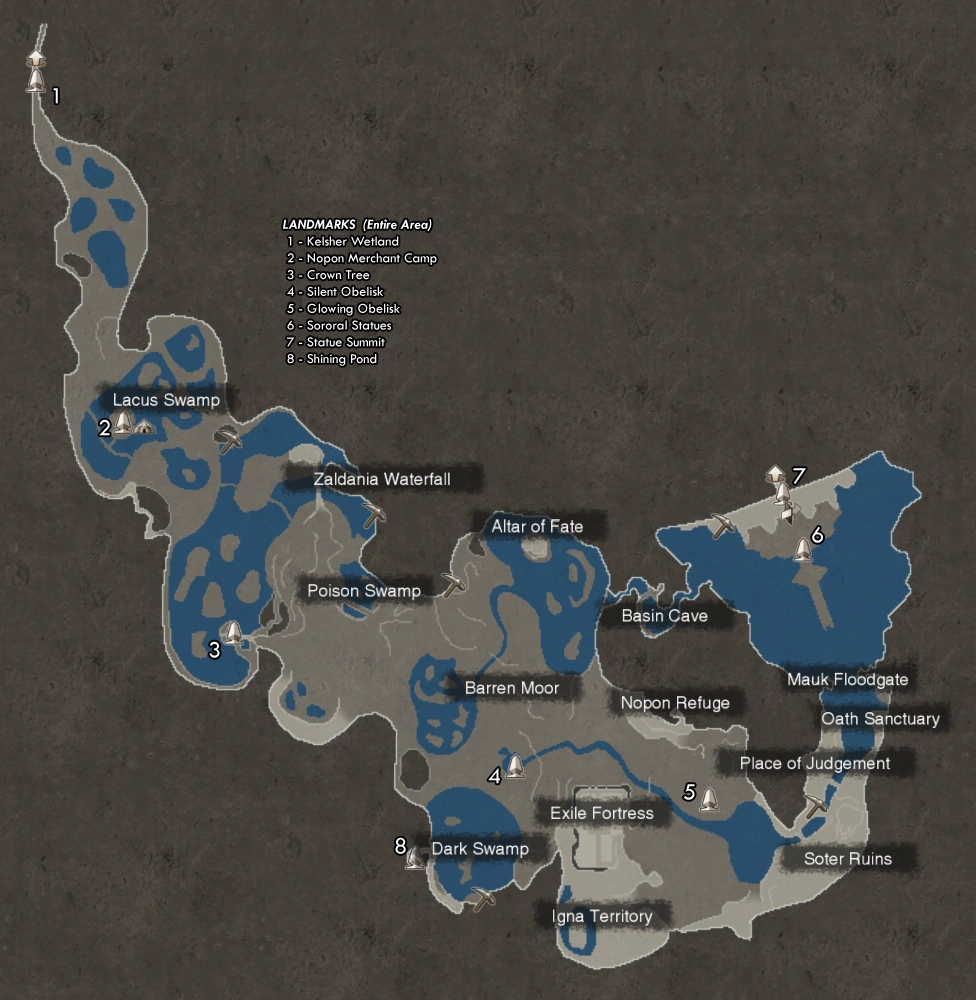

Map of Satorl Marsh (click to enlarge)
- On a slight cliff SSE of the 诺彭 商人 Camp [Electric]
- On a cliff E of Poison Swamp and SW of the Altar of Fate [Earth]
- At water level N of Soter Ruins and S of Place of Judgement [Water]
- In a waterfall SSE of Zaldania Waterfall and N of Poison Swamp [Water]
- S-most part of Dark Swamp [Earth]
- Sororal Statues - E on the statue after climbing the third set of vines [Electric]
Bionis' 内部
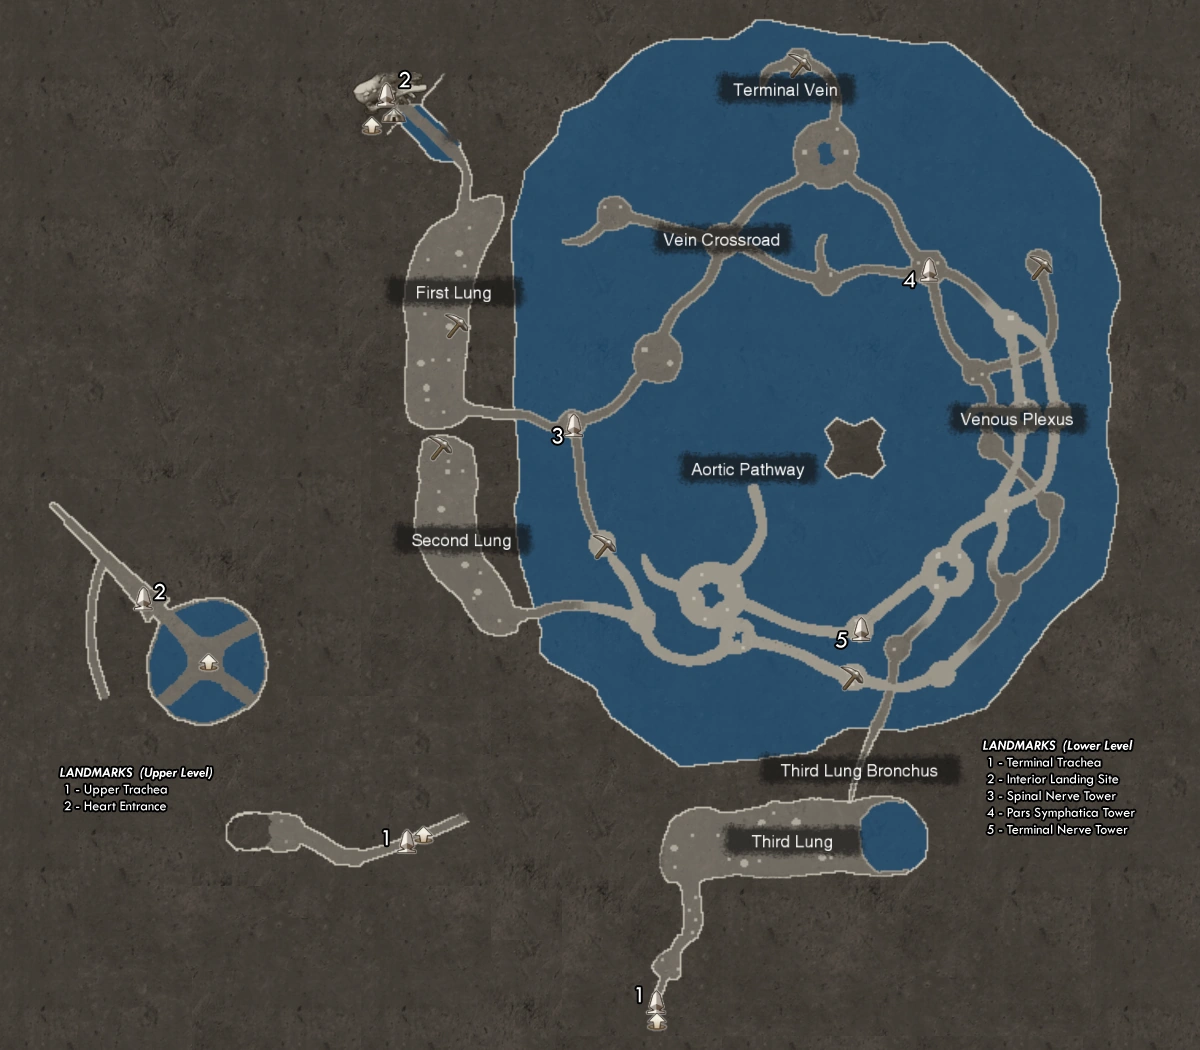

Map of Bionis' 内部 (click to enlarge)
- E side of First Lung [Water]
- N side of Second Lung [Electric]
- Platform E of Second Lung, reachable from path S of deposit [Fire]
- S of 终端 Nerve Tower [Ice]
- E of Pars Sympathica Tower [Wind]
- 终端 Vein [Earth]
Makna Forest
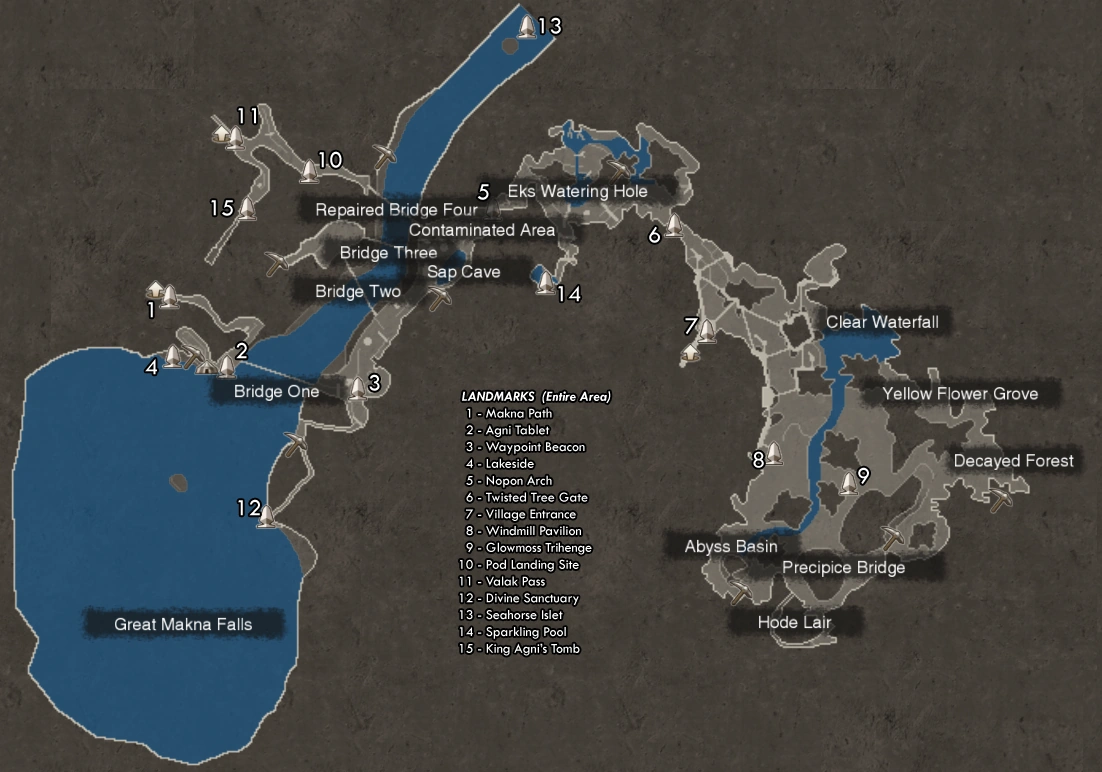
Map of Makna Forest (click to enlarge)
- Lakeside [Water]
- NNE of Divine Sanctuary [Wind]
- SW of Sap Cave [Electric]
- WNW of Bridge Two [Earth]
- SE of Glowmoss Trihenge [Wind]
- Down the vines S of Abyss Basin [Fire]
- Beside the river ENE of Pod Landing Site and N of Bridge Three [Fire]
- Decayed Forest [Fire]
- Strength Up III
- Spike III
- Strength Down III
- Buff Time Plus III
- E of Eks Watering Hole and NW of Twisted Tree Gate [Earth]
Eryth Sea
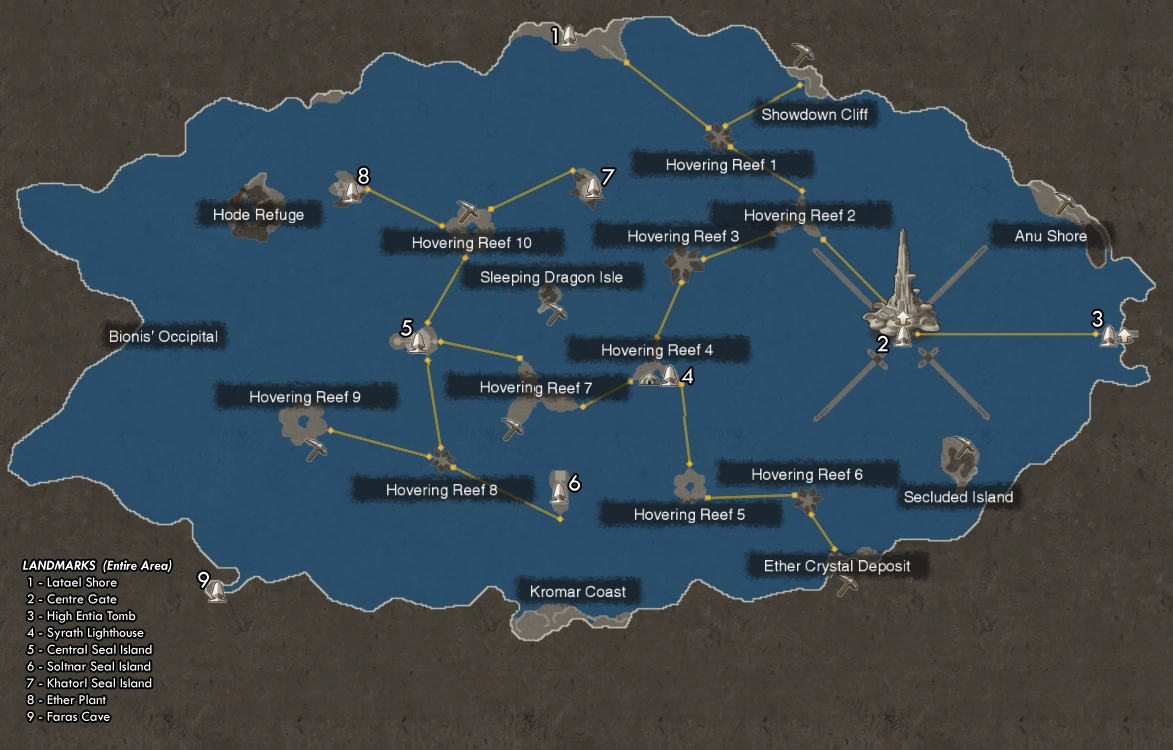
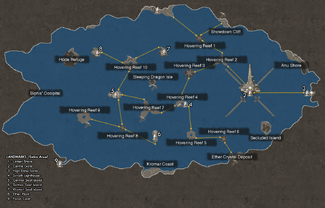
Map of Eryth Sea (click to enlarge)
- Showdown Cliff to the NE on the upper level [Wind]
- Anu Shore on the upper level [Electric]
- Secluded Island [Water]
- Sleeping Dragon Isle [Water]
- SW on Hovering Reef 7 [Wind]
- N on Hovering Reef 10 [Electric]
- 以太 Up III
- 雷电 Plus III
- 以太 Crystal Deposit [Electric]
- 以太 Up III
- 雷电 Plus III
- Daze Up III
- Tension Swing III
- Below Hovering Reef 9 [Wind]
Valak Mountain
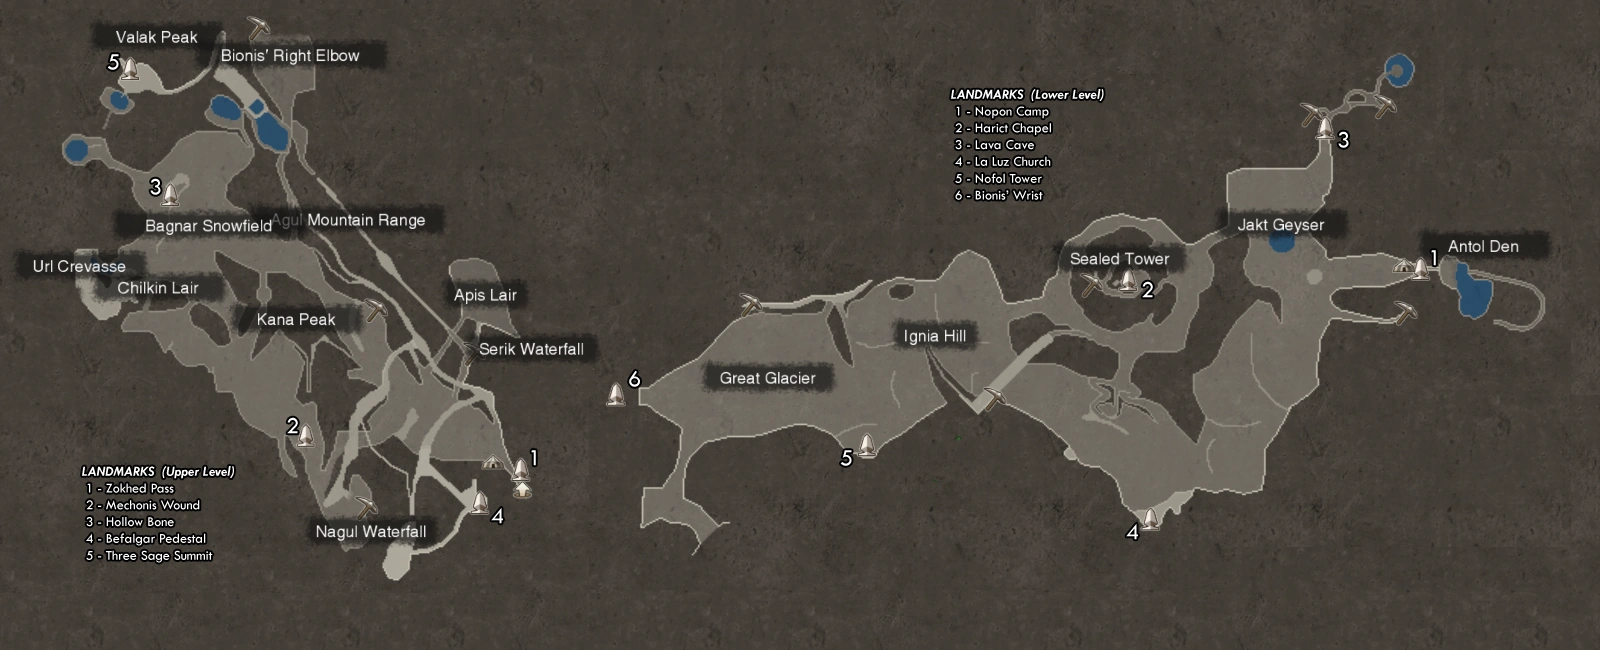
Map of Valak Mountain (click to enlarge)
- Serik Waterfall (Mine symbol is obscured on area map by location name) [Water]
- E of Kana Peak and WSW of Apis Lair [Wind]
- Nagul Waterfall [Ice]
- S of 诺彭 Camp [Wind]
- W deposit in Lava Cave [Fire]
- E deposit in Lava Cave [Fire]
- E of Harict Chapel [Water]
- SE of Ignia Hill and far NW of La Luz Church [Ice]
- Bionis' Right Elbow N [Water]
- N of Great Glacier on a ledge [Ice]
Sword Valley
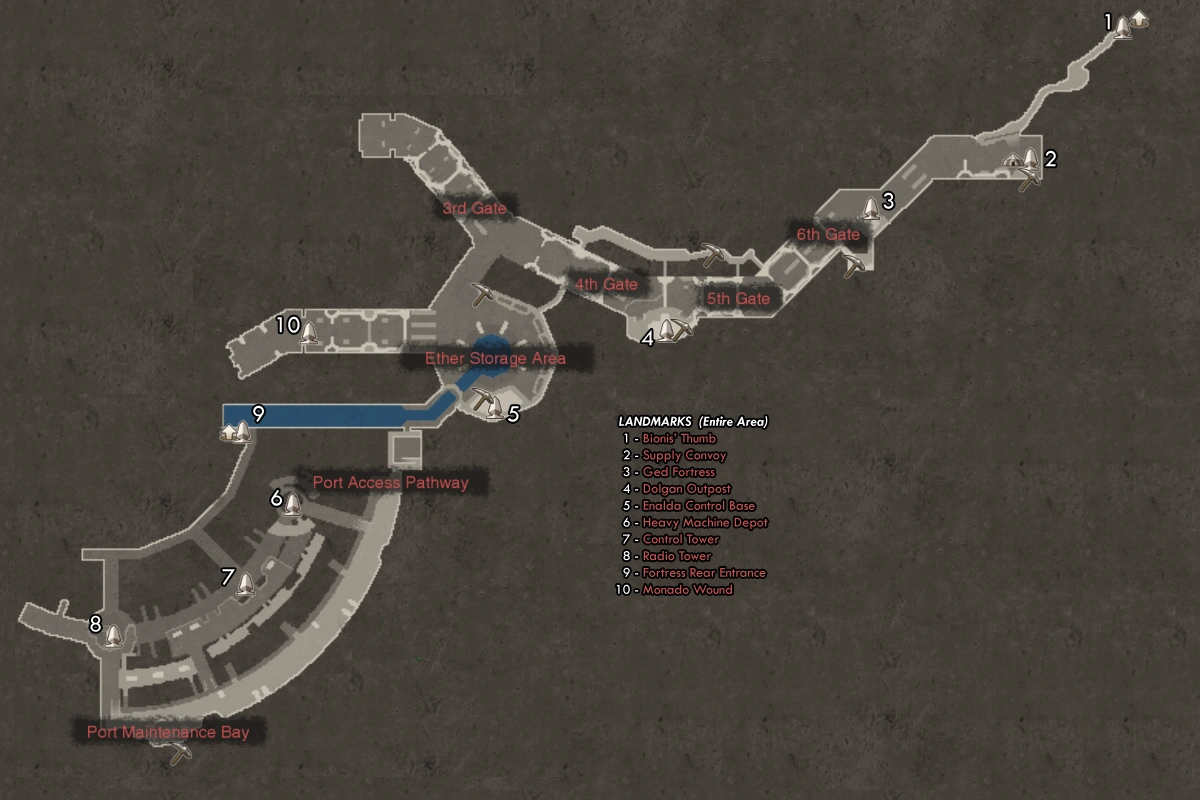
Map of Sword Valley (click to enlarge)
- Supply Convoy [Earth]
- SSE of Ged Fortress [Electric]
- Upper floor of Dolgan Outpost [Wind]
- NNE of Dolgan Outpost and NNW of 5th Gate [Fire]
- On a catwalk NNW of 以太 Storage Area and S of 3rd Gate [Fire]
- Upper floor of Enalda 魂控 Base [Electric]
- 以太 Up III
- First Attack Plus III
- Port Maintenance Bay [Wind]
- Agility Up III
- Arts Seal Resist III
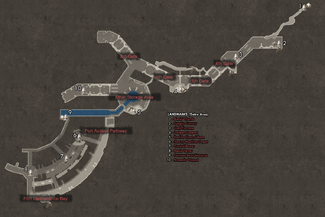
Galahad Fortress

Map of Galahad Fortress (click to enlarge)
- Main Maintenance Bay [Earth]
- NE of 1st Turbine Room [Fire]
- 以太爆发 Furnace - SW 以太 Gear [Water]
- 以太爆发 Furnace - SE 以太 Gear [Fire]
- Strength Up III
- Initial Tension III
- 以太爆发 Furnace - NE 以太 Gear [Water]
- 以太爆发 Furnace - NW 以太 Gear [Earth]
Fallen Arm
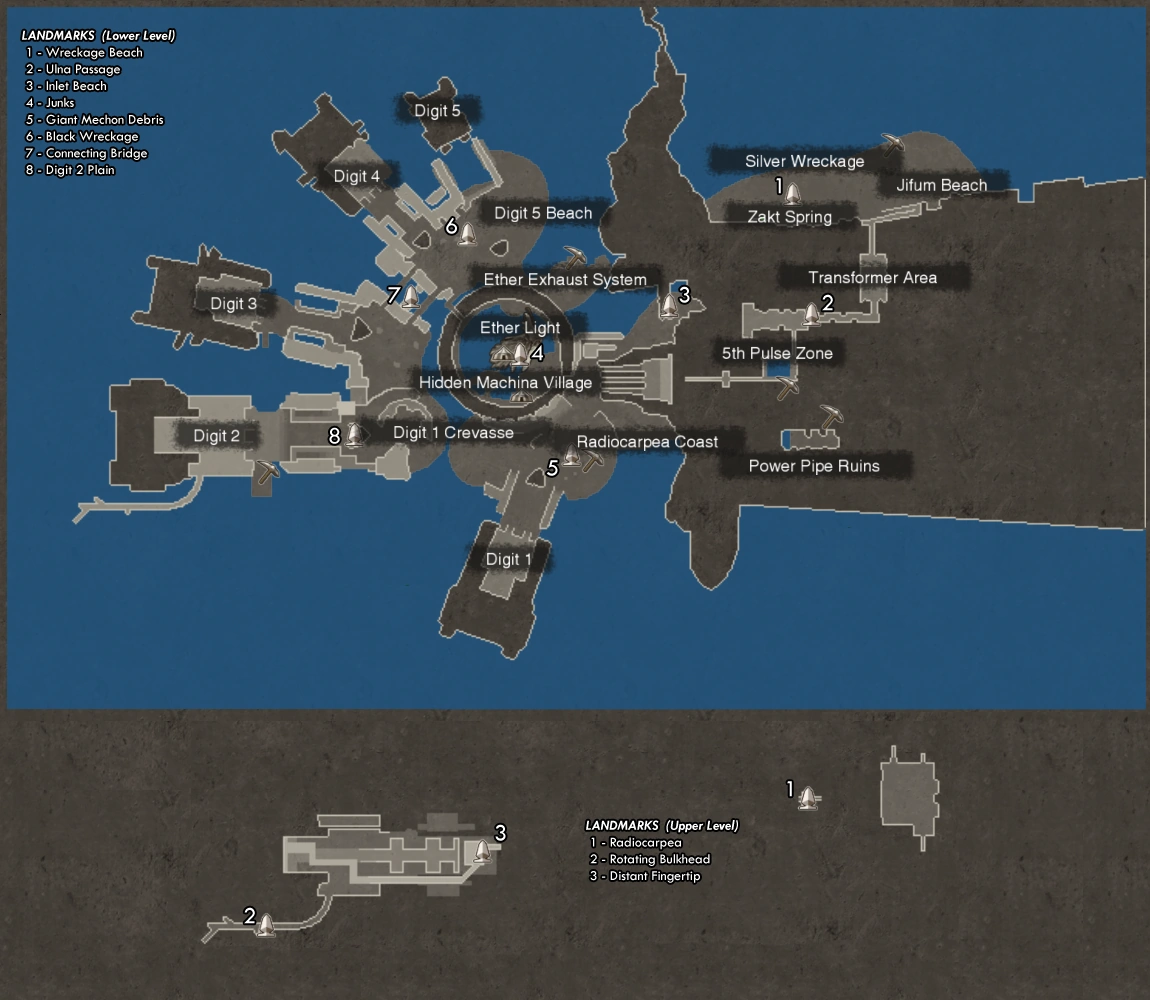

Map of the Fallen Arm (click to enlarge)
- E of Silver 残骸 [Earth]
- Power Pipe Ruins [Ice]
- 5th Pulse Zone [Earth]
- E of Giant Mechon Debris [Ice]
- 以太 Exhaust System [Earth]
- Muscle Up IV
- Debuff Plus IV
- Digit 2 S on a platform at sea level [Ice]
- 以太 Def Up IV
- Blaze Defence IV
Mechonis Field
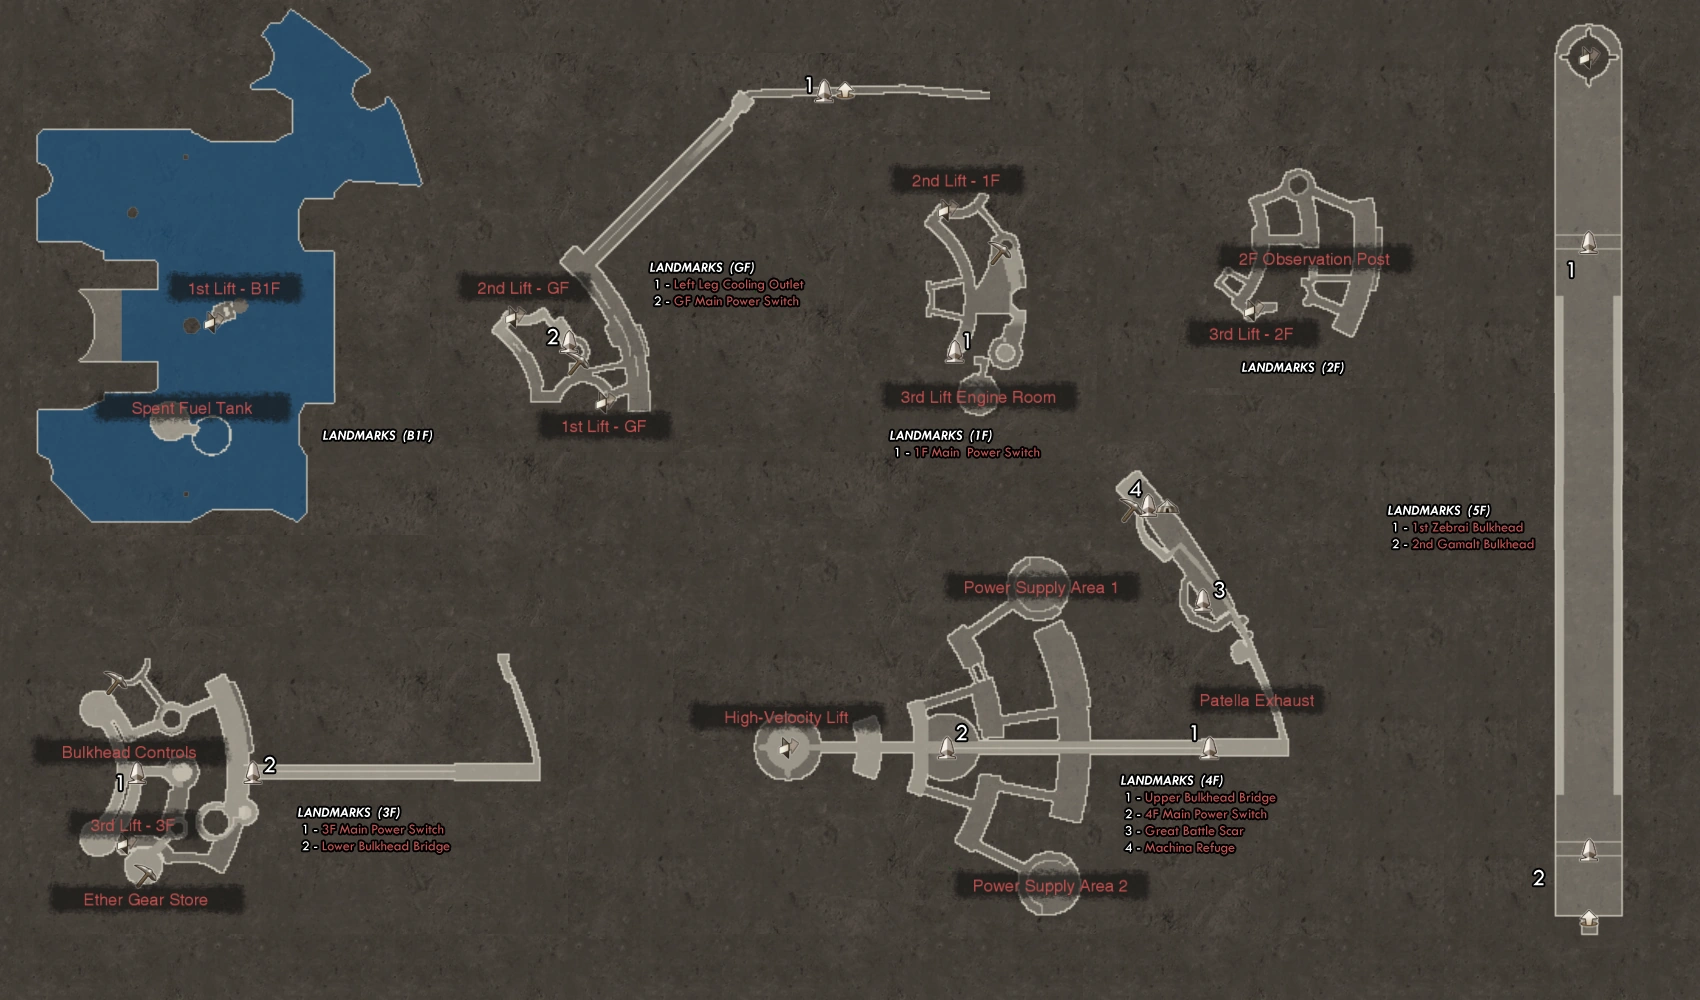
Map of Mechonis Field (click to enlarge)
- NNE of 1st Lift - GF [Electric]
- SE of 2nd Lift - 1F on a ledge after a long climb down [Ice]
- NNW of Bulkhead 魂控 [Electric]
- 以太 Gear Store [Fire]
- 以太 Gear Store [Earth]
- Machina Refuge [Fire]
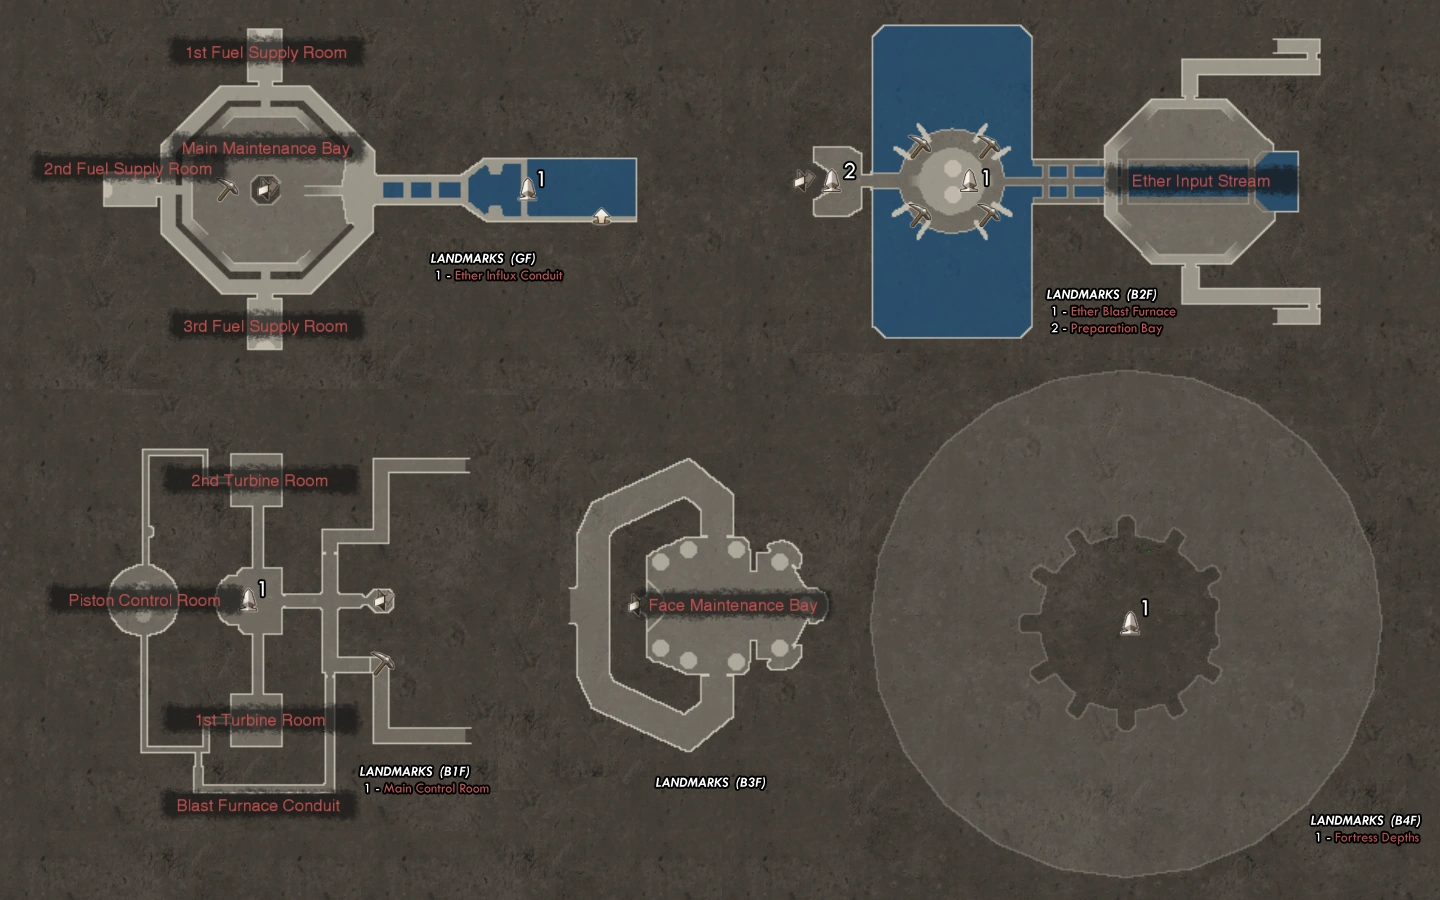
Central Factory

Map of Central Factory (click to enlarge)
- 1F, S-most 以太 Gear, no nearby locations or landmarks [Fire]
- N of 魂控 Tower [Water]
- Storage Depot [Electric]
- 1F, W-most 以太 Gear, no nearby locations or landmarks [Earth]
- WSW of Tower Boarding Gate [Water]
- WNW of Tower Boarding Gate [Earth]
- NE of Regeneration 魂控 [Electric]
- N of Face Maintenance Bay [Fire]
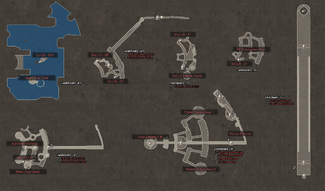
Agniratha
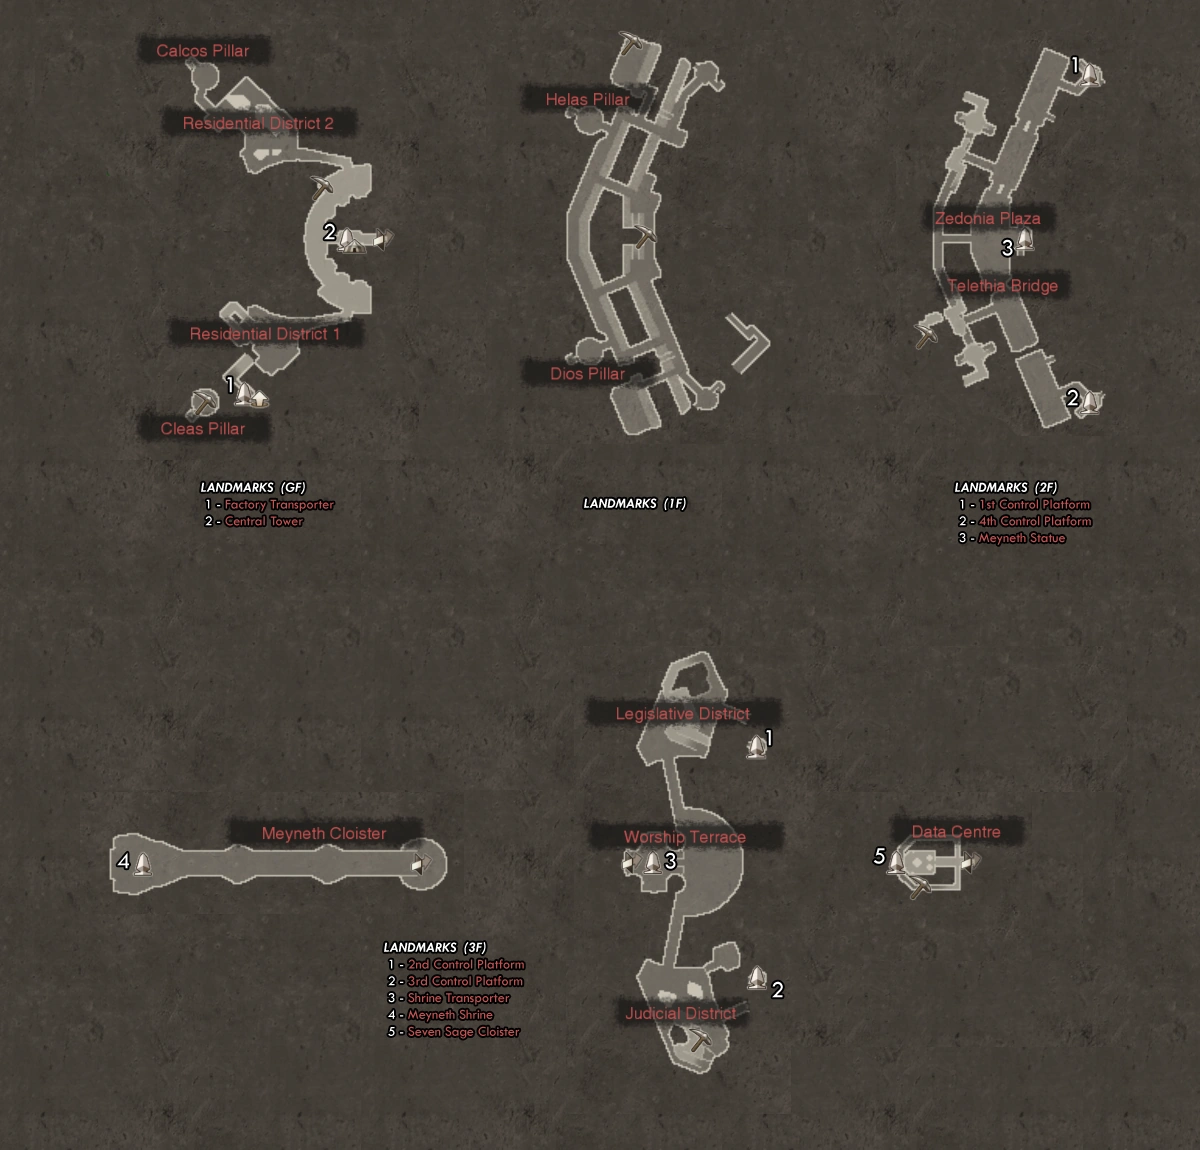
Map of Agniratha (click to enlarge)
- NNW of Central Tower [Electric]
- SE of Seven Sage Cloister [Wind]
- NNE of Helas Pillar [Fire]
- 1F, E-Central 以太 gear [Wind]
- Cleas Pillar [Water]
- WSW of 特雷西亚 Bridge [Fire]
- S of Judicial District [Electric]

